
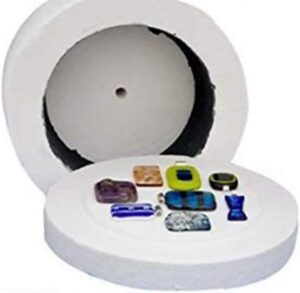
Fusing glass for fun is a highly rewarding, accessible hobby that lets you melt colored glass together in a kiln to create stunning jewelry, suncatchers, and decorative art. You do not need a massive, expensive industrial studio to start; many beginners begin right at their kitchen counter using a small, affordable microwave kiln.
Here is a comprehensive overview of how to start fusing glass safely and successfully.
Essential Equipment & Supplies
To get started, you will need a few foundational tools and materials:
- A Kiln: A standard microwave kiln is perfect for small items like pendants and earrings. It sits inside a standard household microwave (ideally 800 to 1,200 watts) and heats up in minutes.
- Compatible Glass: Glass expands and contracts as it heats and cools. You must use glass with the exact same Coefficient of Expansion (COE) so your piece doesn’t crack. The two most common crafting standards are COE 90 and COE 96.
- Glass Cutters & Pliers: A standard pistol-grip oil cutter helps you score straight or curved lines. Running pliers and wheeled glass nippers are used to cleanly snap the glass along your scored lines.
- Kiln Paper: A small piece of ceramic shelf paper (or kiln wash) must always be placed under your project. This prevents the melting glass from permanently sticking to the floor of your kiln.
- Safety Gear: Always wear ANSI-approved safety glasses when cutting or nipping glass to protect your eyes from flying splinters. A lightweight dust mask is recommended when handling kiln paper or glass powders.
The Basic Glass Fusing Process
Glass fusing generally follows four simple, satisfying steps:
- Design & Cut: Wipe your sheet glass clean with rubbing alcohol. Score and cut your base shape, then cut smaller accent pieces, glass dots (frit), or thin glass threads (stringers) to layer on top.
- Layer the Glass: Stack your design on a piece of kiln paper. For a smooth, rounded finish, a total thickness of about 2 layers (approx. 6mm) is ideal.
- The Firing Process: Place the kiln paper and your glass stack onto the kiln base. Put the kiln lid on, place it in your microwave, and heat it. In a microwave kiln, a full fuse usually takes anywhere from 3 to 6 minutes.
- Annealing & Cooling: This is the most critical step for success. Once the glass melts to your liking, keep the kiln lid on and let it cool completely to room temperature (usually 20 to 30 minutes). Cooling too fast causes thermal shock, which will shatter your art.
Expert Tips for Beginners
- Test Your Microwave Times: Every microwave heats differently. Start with short, 2-minute bursts, then check your glass in 30-second increments to see how it melts. Write down your ideal times.
- Avoid Devitrification: If glass is heated too slowly or held at high temperatures for too long, it can develop a dull, cloudy, or scummy white surface texture. Clean your glass thoroughly before firing to prevent dirt from trapping gasses and causing this crystallization.
Watch the Layers: Due to the natural physics of molten glass, it always wants to naturally flow until it is 6mm thick. If your design is too thin, the edges will pull inward. If it is too thick, the glass will spread outward.
Fusing glass for fun is ok, but please learn about safety too. Remember you are working with very, very, hot glass. A good way to learn more is through watching YouTube videos.